Hallway Gallery Wall Layout
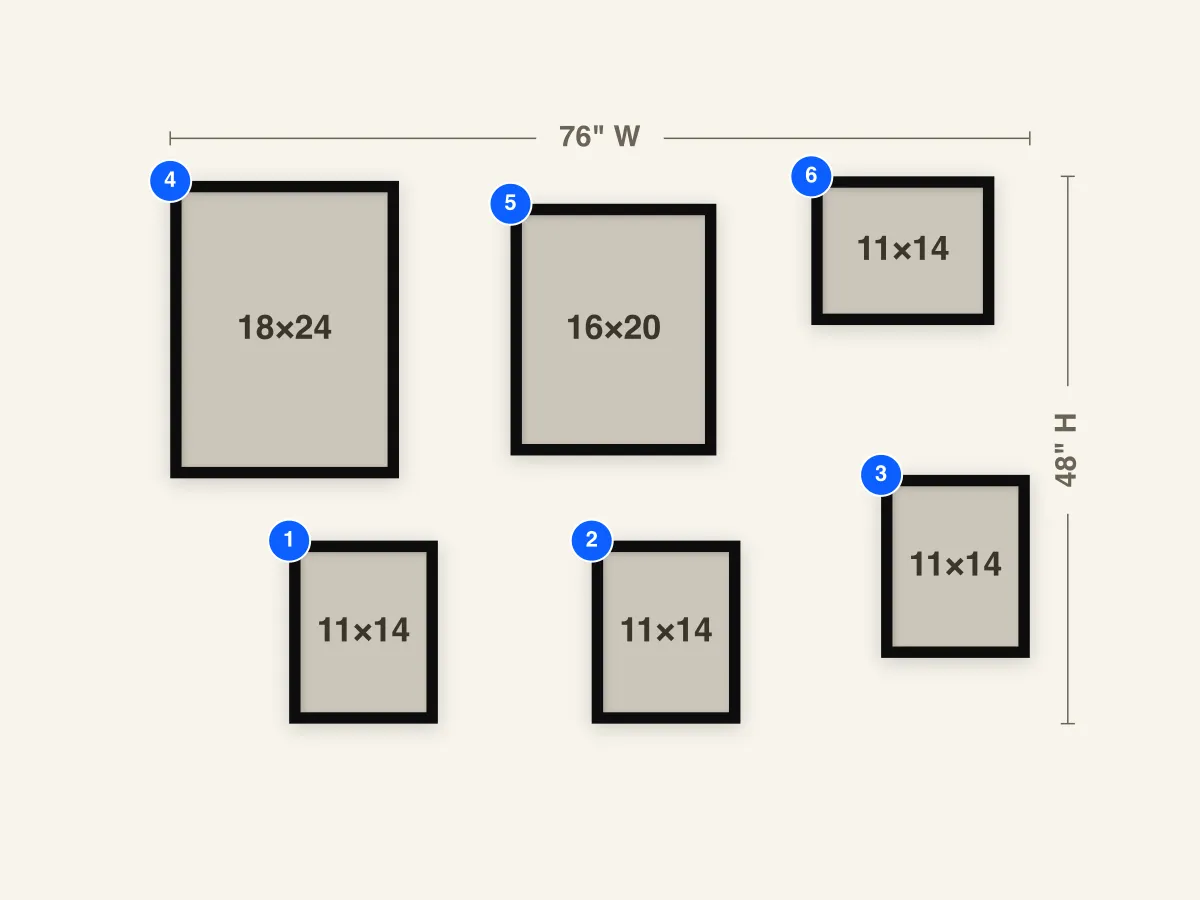
A six-frame, two-row layout for long hallway walls. A tall 18×24 and a 16×20 anchor the upper row, and three 11×14 frames stagger along the lower row to keep the eye moving.
Frames to buy
- 1×18×24 frame
- 1×16×20 frame
- 4×11×14 frames
Frame breakdown
| # | Size | Role |
|---|---|---|
| 1 | 11×14 Portrait | Lower-left 11×14 — starts the lower row under the tall anchor |
| 2 | 11×14 Portrait | Lower-center 11×14 — carries the lower row across the middle |
| 3 | 11×14 Portrait | Lower-right 11×14 — sits slightly higher to lift the right end |
| 4 | 18×24 Portrait | Upper-left 18×24 — the tallest frame and the visual anchor |
| 5 | 16×20 Portrait | Upper-center 16×20 — the second anchor, balancing the left side |
| 6 | 11×14 Landscape | Upper-right 11×14 landscape — a horizontal cap that closes the row |
How to use this layout
Hallways are seen in motion. People walk past the wall instead of standing in front of it, so a tight cluster in the middle gets lost. This layout spreads six frames across about 76" of wall in two loose rows, so there is always something at eye level as you walk.
The upper row carries the weight. An 18×24 and a 16×20 give the wall two strong anchors, and an 11×14 turned landscape closes the row on the right. The lower row uses three 11×14 portraits, staggered slightly so the layout feels collected over time rather than hung in a single afternoon. The gaps are wider than in a tight cluster so six frames can span a long wall. In a narrow hallway you see up close, pull the frames in to an even 2"–3" in GalleryPlanner first, then export the Hanging Guide from that adjusted plan.
The mix of large and medium frames makes this a good home for your best pieces. Put the photos or prints you love most in #4 and #5, and use the smaller frames for supporting images. In a narrow hallway, choose art that reads well up close, since you'll rarely see this wall from more than a few feet away.
Install notes
Start with the 18×24 anchor (#4). Hang it so the layout's center line sits around 57"–60" from the floor. In a hallway, people see the wall from close by, so resist hanging anything higher than you would in a living room. Then hang the 16×20 (#5) to its right with its center at the same height, so the two anchors share one line.
Add the upper-right landscape (#6), then work along the lower row: #1 under the tall anchor, #2 under the center, and #3 at the right end, a little higher than the other two. Whatever spacing you settle on, don't space these by eye. Take the from-left and from-bottom values from the Hanging Guide for your final plan so the stagger looks deliberate.
Check your clearances before you drill. Light switches, door frames, and thermostats cluster in hallways. Add them as Wall Objects (a Pro feature) in GalleryPlanner first, and move the layout along the wall until nothing collides.