Salon-Style Gallery Wall Layout
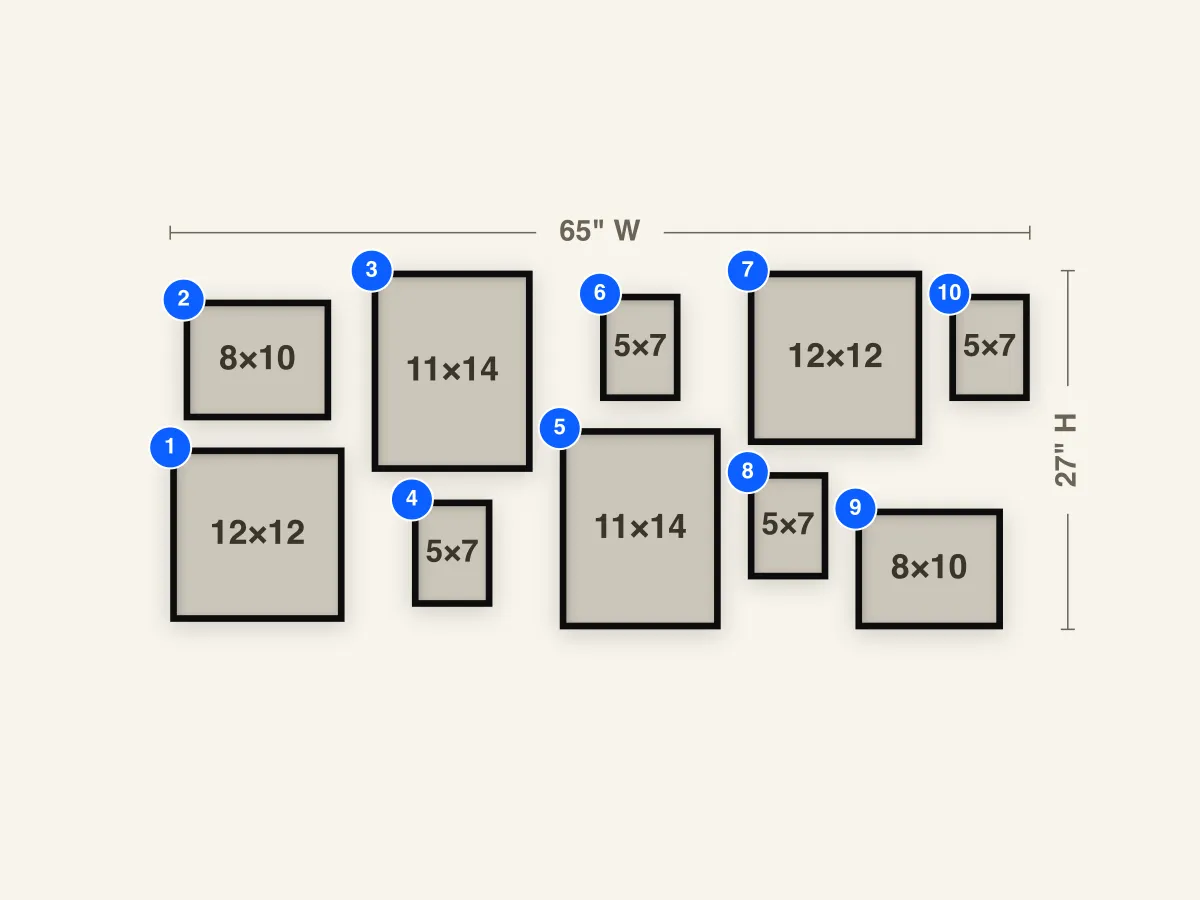
A ten-frame salon-style layout mixing 12×12, 11×14, 8×10, and 5×7 frames in two loose rows. At about 65" × 27" it brings the collected, layered look to a sofa wall or a long hallway.
Included with GalleryPlanner Pro.
Frames to buy
- 2×11×14 frames
- 2×12×12 frames
- 2×8×10 frames
- 4×5×7 frames
Frame breakdown
| # | Size | Role |
|---|---|---|
| 1 | 12×12 Square | 12×12 — anchors the lower-left corner |
| 2 | 8×10 Landscape | 8×10 landscape — sits above the corner square |
| 3 | 11×14 Portrait | 11×14 portrait — the first tall piece, lifting the upper row |
| 4 | 5×7 Portrait | 5×7 — a small accent tucked into the lower row |
| 5 | 11×14 Portrait | 11×14 portrait — the second tall piece, anchoring the center |
| 6 | 5×7 Portrait | 5×7 — a small accent above the center anchor |
| 7 | 12×12 Square | 12×12 — anchors the upper right, mirroring the lower-left square |
| 8 | 5×7 Portrait | 5×7 — a small accent under the upper-right square |
| 9 | 8×10 Landscape | 8×10 landscape — carries the lower row toward the right edge |
| 10 | 5×7 Portrait | 5×7 — caps the upper-right corner |
How to use this layout
Salon-style walls look collected over years, with frames of different sizes packed close together. The hard part is making "eclectic" look deliberate. This layout does that by pairing its sizes: two 12×12 squares at opposite corners, two 11×14 portraits in the middle, two 8×10 landscapes, and four 5×7 accents. The pairs repeat across the layout, so the variety feels balanced.
This is a compact take on the salon style. A full salon wall runs close to floor to ceiling with tight, even gaps; this version keeps the mixed sizes in two looser rows about 65" wide and 27" tall, with gaps between about 2" and 5", so it fits above furniture. Tighten the gaps or add frames above and below to push it toward a full salon wall. That width suits the wall above a sofa or sideboard, or a long hallway. The two 11×14 frames are the tallest pieces and do most of the vertical work; the 5×7 frames fill the spaces between.
Salon walls invite mixing: photos with prints, color with black-and-white, even a small mirror or textile. To keep it cohesive, repeat something across the wall, such as a frame finish, a color, or a subject. If your frames don't match, keep the mix of finishes intentional, for example all wood tones or all metals.
Install notes
Start with the two 11×14 frames (#3 and #5), one in each row. They set the height of the layout, so put the midpoint between them at about 57"–60" from the floor, or 8"–10" above the furniture below. Then add the two 12×12 corner squares (#1 and #7), which set the layout's width.
Fill in the rest from the center outward: the 8×10 landscapes (#2 and #9), then the four 5×7 accents (#4, #6, #8, and #10). Salon walls look best when the gaps are close but not identical, so follow the plan rather than forcing even spacing.
With ten frames in varied sizes, measuring from a single corner is the most reliable approach. The Hanging Guide gives from-left and from-bottom values for every frame, so the loose look stays on plan.