Centerpiece Gallery Wall Layout
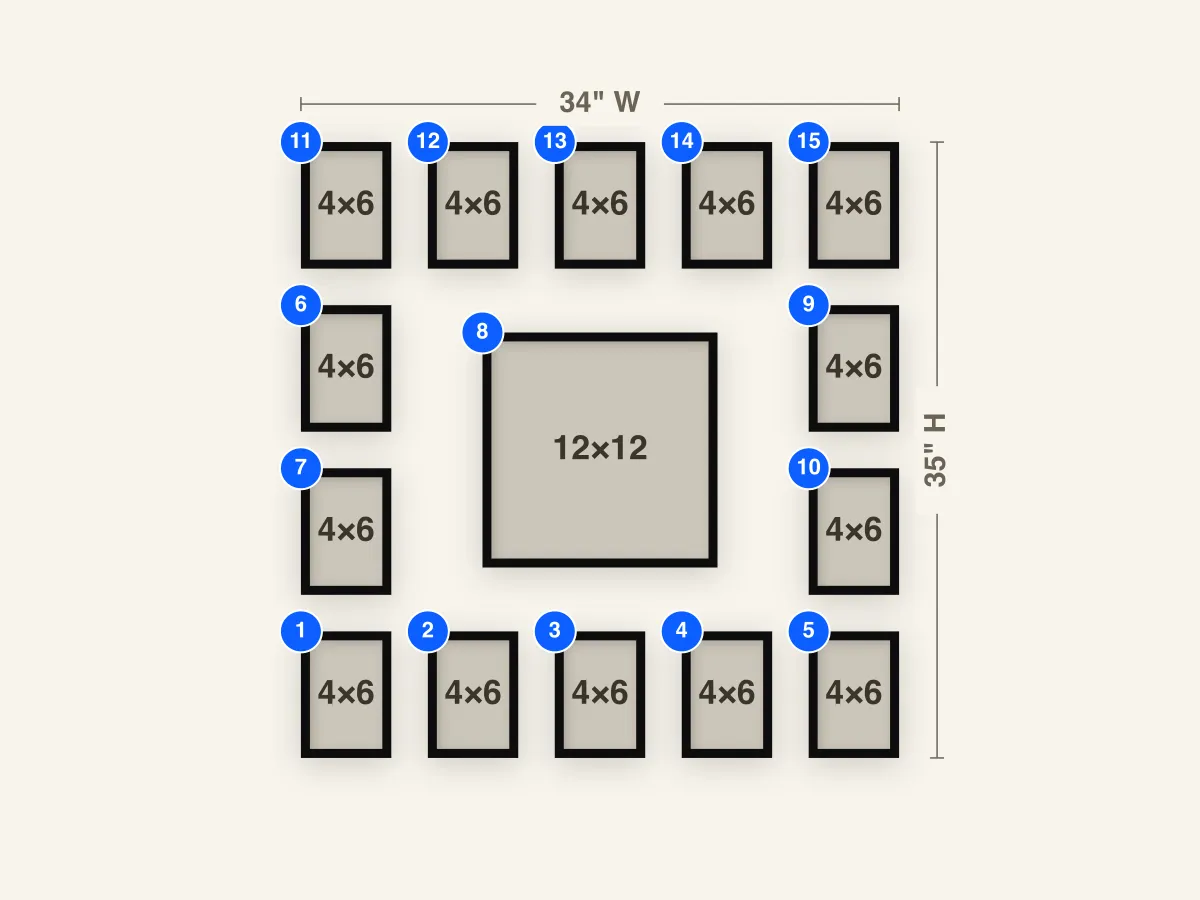
Fourteen 4×6 frames ring a 12×12 centerpiece. The small frames form a border around one bold piece, a round mirror, or a favorite print, for a gallery wall that draws the eye to the middle.
Included with GalleryPlanner Pro.
Frames to buy
- 1×12×12 frame
- 14×4×6 frames
Frame breakdown
| # | Size | Role |
|---|---|---|
| 1 | 4×6 Portrait | Bottom row of the ring — five 4×6 frames under the centerpiece |
| 2 | 4×6 Portrait | |
| 3 | 4×6 Portrait | |
| 4 | 4×6 Portrait | |
| 5 | 4×6 Portrait | |
| 6 | 4×6 Portrait | Left side of the ring — two 4×6 frames beside the centerpiece |
| 7 | 4×6 Portrait | |
| 8 | 12×12 Square | Centerpiece — the 12×12 focal point everything else frames |
| 9 | 4×6 Portrait | Right side of the ring — two 4×6 frames mirroring the left |
| 10 | 4×6 Portrait | |
| 11 | 4×6 Portrait | Top row of the ring — five 4×6 frames above the centerpiece |
| 12 | 4×6 Portrait | |
| 13 | 4×6 Portrait | |
| 14 | 4×6 Portrait | |
| 15 | 4×6 Portrait |
How to use this layout
This layout is built around one piece. A 12×12 centerpiece sits in the middle of a ring of fourteen 4×6 frames: five across the top, five across the bottom, and two down each side. The whole arrangement covers about 34" wide by 35" tall.
The contrast in scale does the work. The small frames repeat so evenly that they read as a border, which sends the eye straight to the center. That makes this layout a natural fit for a round or square mirror about 12" across, a favorite print, or a single standout photo. In an entryway, a mirror in the middle gives you a last look on the way out the door.
The ring is a good home for small photos: 4×6 is a standard print size, so you can fill it straight from your phone. For a calm look, keep the ring in black-and-white and let the centerpiece carry the color. For something livelier, pull the ring's colors from the centerpiece.
Install notes
Hang the centerpiece (#8) first. Center it at about 57"–60" from the floor, or 8"–10" above a console, and level it carefully. The ring is measured from this frame, so any tilt here shows up all the way around.
Then hang the side columns (#6–#7 on the left, #9–#10 on the right), about 5" out from the centerpiece's edges. Add the top row (#11–#15) and bottom row (#1–#5) last, with about 2" between the small frames. The corner frames (#1, #5, #11, and #15) line up with the side columns, so check them against those columns as you go.
Small frames are light enough for picture-hanging strips, which makes fine adjustments easier than nails. Whatever you use, mark every position first with the from-left and from-bottom values from the Hanging Guide. Fourteen small frames leave little room for guesswork.