Gallery Wall With One Large Frame
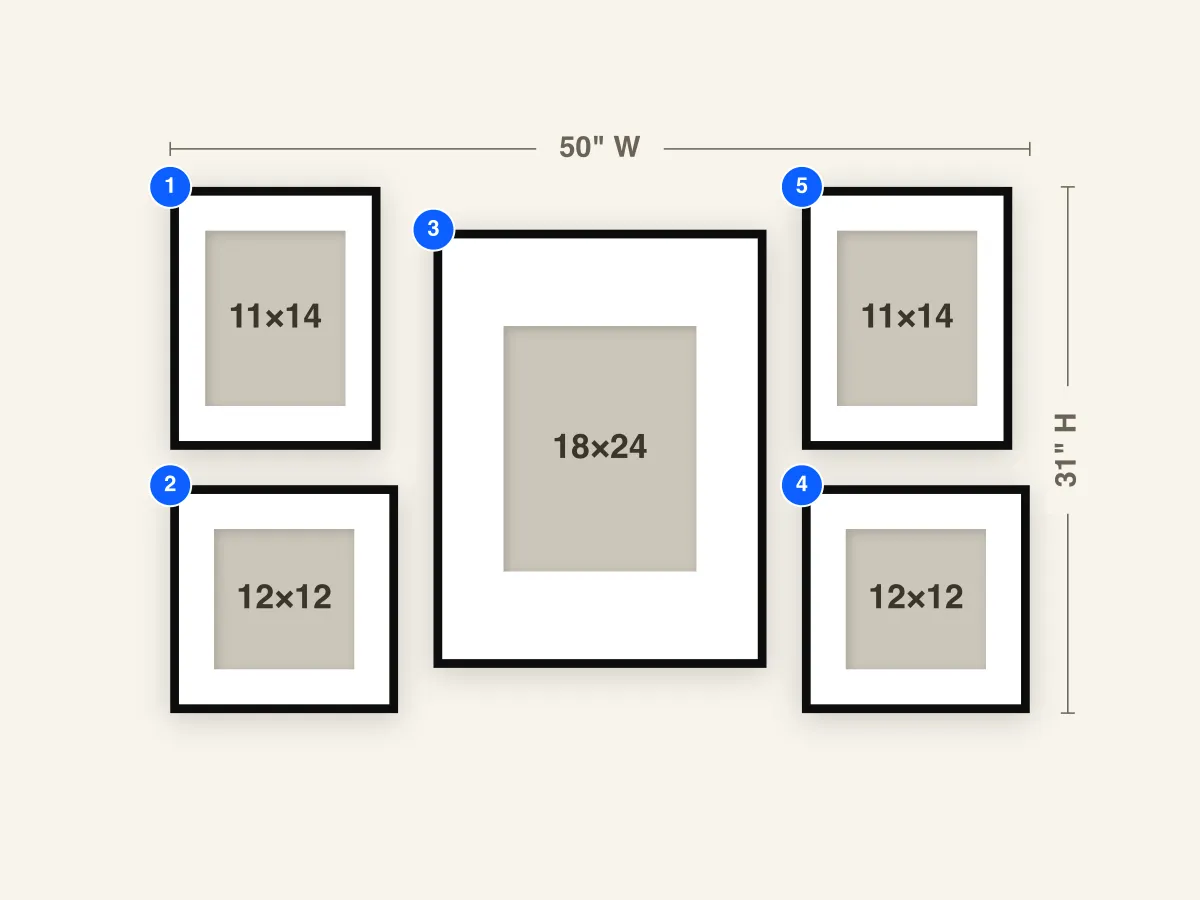
A five-frame layout built around one big piece: an 18×24 frame with an 11×14 mat in the center, with two smaller frames stacked on either side. At about 50" wide by 31" tall it suits a sofa wall, a bed, or a dining room.
Frames to buy
- 1×18×24 frame with a 11×14 mat opening
- 2×11×14 frames with a 8×10 mat opening
- 2×12×12 frames with a 8×8 mat opening
Frame breakdown
| # | Size | Mat opening | Role |
|---|---|---|---|
| 1 | 11×14 Portrait | 8×10 | 11×14 with an 8×10 mat — upper left, the twin of #5 on the right |
| 2 | 12×12 Square | 8×8 | 12×12 with an 8×8 mat — lower left, under the 11×14 |
| 3 | 18×24 Portrait | 11×14 | 18×24 with an 11×14 mat — the large center piece everything else supports |
| 4 | 12×12 Square | 8×8 | 12×12 with an 8×8 mat — lower right, under the 11×14 |
| 5 | 11×14 Portrait | 8×10 | 11×14 with an 8×10 mat — upper right, beside the large frame |
How to use this layout
Sometimes you have one piece you love: a big print, a painting, or a favorite enlargement. This layout is built to show it off. The large 18×24 frame (#3) sits in the center with an 11×14 mat, and four smaller frames flank it, two on each side. On each side, an 11×14 with an 8×10 mat sits above a square 12×12 with an 8×8 mat.
The whole arrangement covers about 50" wide by 31" tall, with a few inches between neighboring frames. The side columns stand a little taller than the center frame at both top and bottom, which frames the big piece, and its size keeps it the clear focal point. That makes it a good fit above a sofa or bed, or on a dining room wall.
The mats help the group look planned. Use the large frame for your strongest image, and fill the four companions with images that echo it: details from the same scene, other photos from the same trip, or prints in the same colors. A single frame finish across all five keeps the mix of sizes feeling like one set.
Install notes
Hang the large frame (#3) first. On an open wall, center it at about 57"–60" from the floor. Above a sofa or bed, keep the bottom of the side columns 8"–10" above the furniture, and center the whole group on the furniture. Level the large frame carefully, since the other four are measured from it.
Then add the right column: the 11×14 (#5) beside the large frame, and the 12×12 (#4) below it. Then do the same on the left with #1 and #2. The two sides aren't exact mirror images and the gaps differ slightly, so place each frame from its from-left and from-bottom values in the Hanging Guide rather than measuring by eye.
The large frame carries the most weight, so check what it needs for hardware. Two wall anchors or a French cleat are safer than a single nail. The four smaller frames are lighter, and picture-hanging strips work well for them. The Hanging Guide gives from-left and from-bottom values for all five frames, so you can mark every spot before you commit.