Narrow Wall Gallery Layout
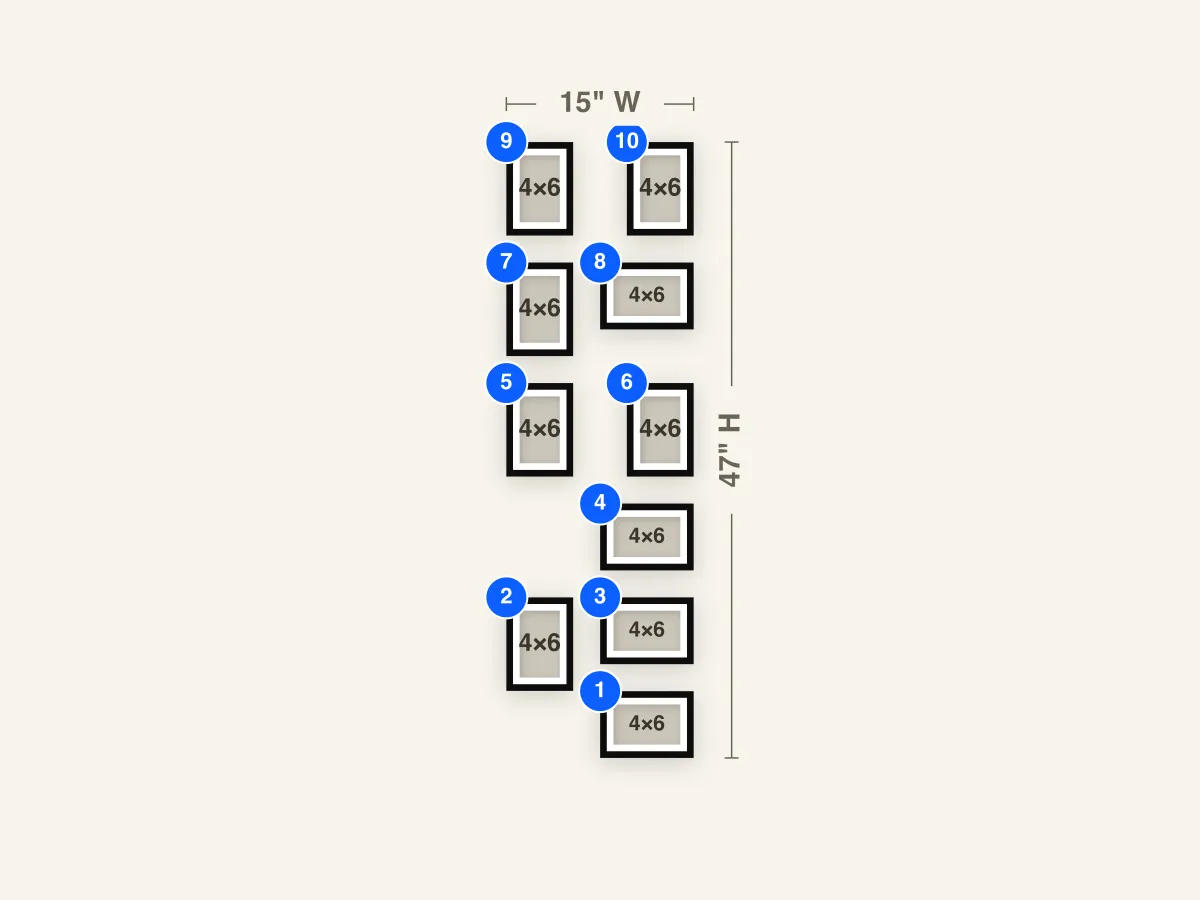
Ten 4×6 frames with 3×5 mats in a tall, narrow column about 15" wide and 47" tall. It turns the slim wall between two doors or windows into a gallery.
Frames to buy
- 10×4×6 frames with a 3×5 mat opening
Frame breakdown
| # | Size | Mat opening | Role |
|---|---|---|---|
| 1 | 4×6 Landscape | 3×5 | Lower section — mostly landscape frames that give the column a steady base |
| 2 | 4×6 Portrait | 3×5 | |
| 3 | 4×6 Landscape | 3×5 | |
| 4 | 4×6 Landscape | 3×5 | |
| 5 | 4×6 Portrait | 3×5 | Middle section — frames paired side by side to widen the column |
| 6 | 4×6 Portrait | 3×5 | |
| 7 | 4×6 Portrait | 3×5 | |
| 8 | 4×6 Landscape | 3×5 | |
| 9 | 4×6 Portrait | 3×5 | Top pair — two portraits that finish the column at its highest point |
| 10 | 4×6 Portrait | 3×5 |
How to use this layout
Most homes have at least one narrow strip of wall: between two doors, between windows, or beside a doorway. A single frame looks lost there. This layout stacks ten small frames into a column about 15" wide and 47" tall, so it fills the height of the space instead of just one spot.
Every frame is a 4×6 with a 3×5 mat, so the shopping list is one line. Mixing orientations does the design work: four of the ten frames turn sideways, and several sit in side-by-side pairs, so the column has rhythm instead of looking like a strip of photo-booth prints.
Small, matching frames suit collections: a series of travel photos, family snapshots through the years, or a set of small prints. The mats keep small photos from feeling cramped. Because the column is tall, put the images people will look at longest near eye level, in the middle section.
Install notes
A narrow column is about vertical alignment, so find the center line of the wall space first and mark it with a pencil or painter's tape. The column is about 47" tall, so centering it at 57"–60" puts the bottom frame around 34"–36" from the floor and the top around 81"–84".
Hang the middle section (#5–#8) first, since it's closest to eye level. Then work down through the lower section (#1–#4) and up to the top pair (#9 and #10). Check each frame against the center line and keep the gaps consistent. Small frames make uneven spacing obvious.
The Hanging Guide gives from-left and from-bottom values for all ten frames. On a slim wall, measure from the nearest door or window trim rather than the room corner, and double-check that no frame lands on a light switch.