Mixed-Size Gallery Wall Layout
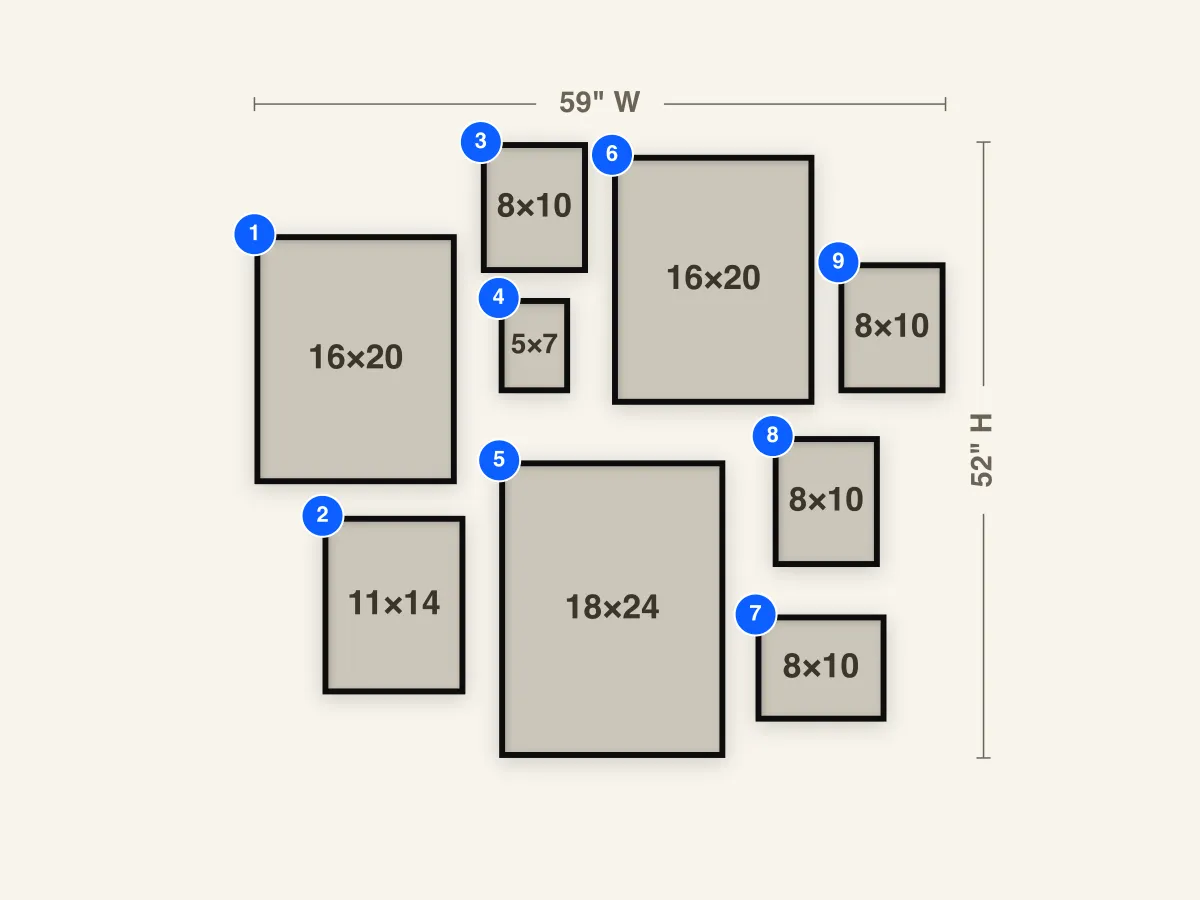
A nine-frame layout that mixes 18×24, 16×20, 11×14, 8×10, and 5×7 frames with similar gaps. At about 59" × 52" it shows how different sizes can still look planned.
Frames to buy
- 1×18×24 frame
- 2×16×20 frames
- 1×11×14 frame
- 4×8×10 frames
- 1×5×7 frame
Frame breakdown
| # | Size | Role |
|---|---|---|
| 1 | 16×20 Portrait | Left 16×20 — matches #6 and sets the left edge |
| 2 | 11×14 Portrait | Lower-left 11×14 — fills the corner below the left 16×20 |
| 3 | 8×10 Portrait | Top 8×10 — sits above the small 5×7 and lifts the upper left |
| 4 | 5×7 Portrait | 5×7 — the smallest frame, tucked into the gap between the two 16×20 frames |
| 5 | 18×24 Portrait | 18×24 — the largest frame, anchoring the lower center |
| 6 | 16×20 Portrait | Upper 16×20 — the center-top anchor that the smaller frames gather around |
| 7 | 8×10 Landscape | Lower-right landscape 8×10 — the one horizontal frame, closing the bottom right |
| 8 | 8×10 Portrait | Right-middle 8×10 — steps the right side down |
| 9 | 8×10 Portrait | Upper-right 8×10 — a small frame that closes the top right |
How to use this layout
Most people don't own a set of matching frames. They have a few large ones, a few medium ones, and some small ones from different stores. This layout shows how to hang that mix so it looks planned. Nine frames in five sizes sit in one loose cluster, with each large frame surrounded by smaller ones.
The group covers roughly 59" wide and 52" tall. Two 16×20 frames (#1 and #6) and one 18×24 (#5) carry the weight. An 11×14 (#2), three 8×10 frames (#3, #8, and #9), a landscape 8×10 (#7), and a 5×7 (#4) fill in around them. The gaps between frames stay within a few inches of each other, and that steady spacing is what makes the different sizes feel intentional. The only horizontal frame is #7, so the portraits don't compete with it.
You can use this layout in a few ways:
- Hang your favorites in the three large frames. The 16×20s and the 18×24 are what people see first. - Use the small frames for details. The 8×10s and the 5×7 suit close-ups, handwriting, or a single object. - Keep one thing the same. Matching frame finishes, a shared color, or similar mats lets the sizes vary without looking random.
To use frames you already own, swap in their sizes in GalleryPlanner and let Auto-Layout rebalance the group. Smart Fill can then place your photos by their shape.
Install notes
Start with the 18×24 (#5). It's the largest frame, and the rest of the group is placed around it. On an open wall, set the middle of the whole layout at about 57"–60" from the floor. Above a sofa or sideboard, keep the bottom of the lowest frame 8"–10" above the furniture, and center the group on the furniture, not on #5.
Next, hang the two 16×20 frames (#1 and #6), then the 11×14 (#2) below #1. Add the 8×10 frames (#3, #8, and #9) and the landscape 8×10 (#7) last, and place the 5×7 (#4) between #1 and #6.
The frames sit at different heights, so there are no shared edges to line up by eye. Take the from-left and from-bottom values from the Hanging Guide and mark every nail position before you drill. Measure from one fixed corner of the group, and level each frame as you hang it.