Above-Bed Gallery Wall Layout
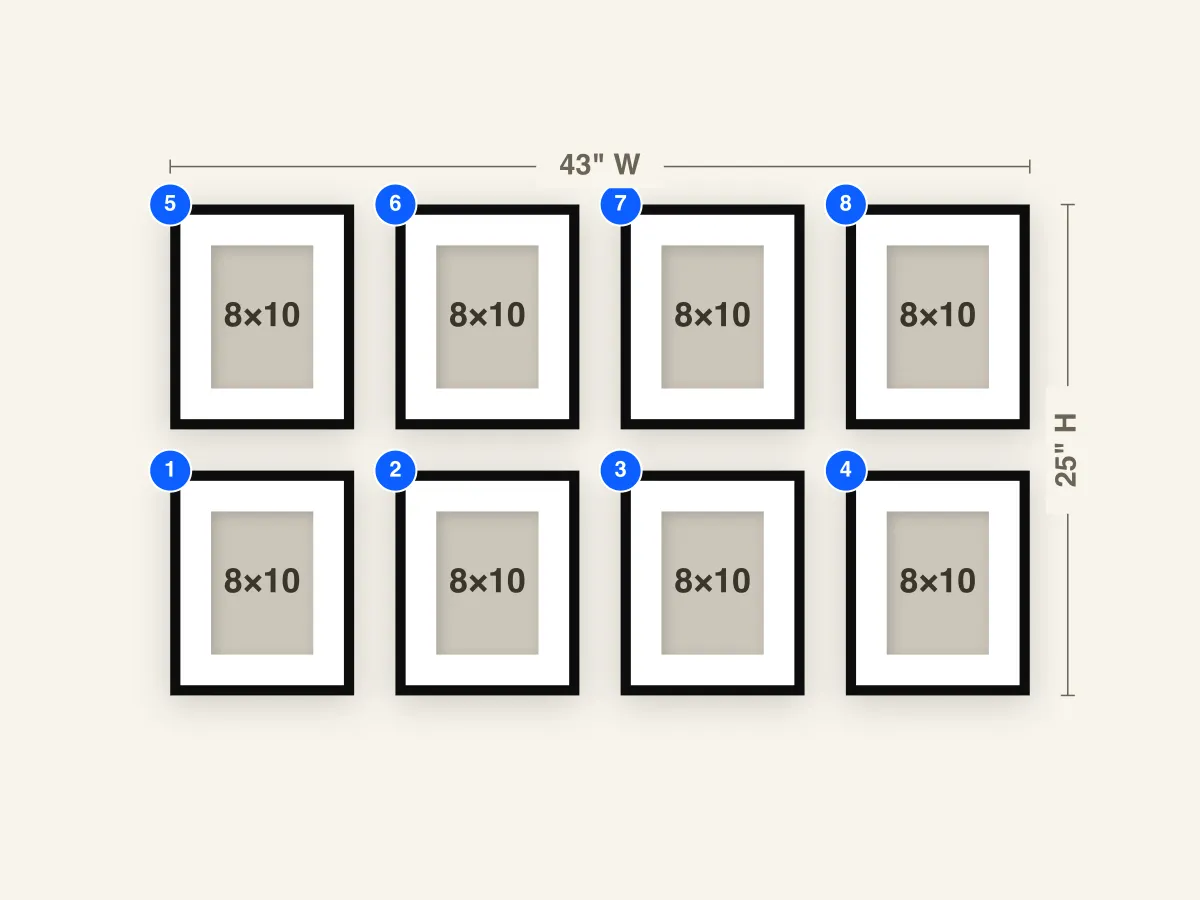
An eight-frame, two-row grid of matching 8×10 frames with 5×7 mats. At about 43" wide by 25" tall it sits comfortably over a queen or full headboard without crowding it.
Frames to buy
- 8×8×10 frames with a 5×7 mat opening
Frame breakdown
| # | Size | Mat opening | Role |
|---|---|---|---|
| 1 | 8×10 Portrait | 5×7 | Bottom row — sits closest to the headboard and sets the line |
| 2 | 8×10 Portrait | 5×7 | |
| 3 | 8×10 Portrait | 5×7 | |
| 4 | 8×10 Portrait | 5×7 | |
| 5 | 8×10 Portrait | 5×7 | Top row — mirrors the bottom row to complete the grid |
| 6 | 8×10 Portrait | 5×7 | |
| 7 | 8×10 Portrait | 5×7 | |
| 8 | 8×10 Portrait | 5×7 |
How to use this layout
The wall above a bed needs something wide and low. A tall cluster fights the horizontal line of the headboard, and a single row can look thin. This layout uses two rows of four matching 8×10 frames with 5×7 mats, about 2" apart, for an arrangement roughly 43" wide by 25" tall.
That width is the point. A queen bed is about 60" wide, so a 43" arrangement covers nearly three-quarters of it, a proportion that looks anchored rather than lost. On a full bed (about 54" wide) it covers closer to 80% and feels fuller. For a king (about 76" wide), consider adding a column to each side, or look at a wider layout.
Because all eight frames match, the look stays calm, which suits a bedroom. Soft black-and-white photos, botanical prints, or a set of travel photos in one color family all work well. The 5×7 mat openings make it easy to print at a standard size.
Install notes
Measure from the top of the headboard, not the floor. Leave about 8"–10" between the headboard and the bottom row (#1–#4) so the art feels connected to the bed without anyone bumping it. If there's no headboard, measure from the top of the mattress and add a few inches.
Center the layout on the bed, not on the wall. The midpoint between frames #2 and #3 should line up with the center of the bed. Hang those two first, then work outward to #1 and #4, and level the row before starting the top row (#5–#8) about 2" above.
Above a bed, safety matters more than usual. Use two hangers per frame or picture-hanging strips rated well above each frame's weight, and choose acrylic glazing over glass if you want extra peace of mind. The Hanging Guide gives exact from-left and from-bottom values, so each frame lands where you planned it.