# Where to Put the Nail When Hanging a Picture: Wire, D-Rings, and Sawtooth
**Quick answer:** Decide where you want the top of the frame. Measure from the top of the frame down to the point where the nail will catch: the peak of the wire pulled tight, the top inside edge of a D-ring, or the notch of a sawtooth hanger. Subtract that from the top-of-frame height. That's your nail height. Left to right, one nail goes at the frame's center; two D-rings get two nails, one on each side of center, as far apart as the rings.
Most frames that hang too high weren't measured wrong. They were measured from the wrong place. The nail doesn't hold the top of the frame, it holds the hardware on the back, and that hardware can sit anywhere from half an inch to five inches below the top edge.
This guide is about one frame at a time: what's on the back, where the nail goes for it, and how to check before you make a hole. If you're hanging a whole arrangement, the [gallery wall hanging guide](/learn/how-to-hang-a-gallery-wall) builds on this with reference lines and measuring a whole wall without errors adding up. For hooks and anchors by wall type, see the [hardware guide](/learn/hanging-hardware-guide).
## The one formula you need
Nail height = height you want the top of the frame − hanger drop
The **hanger drop** is the distance from the top edge of the frame down to where the nail will actually hold it. Everything below is about measuring that one number correctly for each kind of hardware.
If you know where you want the *center* of the picture instead (the usual 57 to 60 inches from the floor), convert it first:
Top of frame = center height + half the frame's height
Use the frame's full outside height, edge to edge, not the photo or mat opening size it's sold by. A frame that measures 16 x 20 inches outside, hung tall with its center at 58 inches, has its top at 58 + 10 = 68 inches. Not sure what center height to use? [How high to hang pictures](/learn/how-high-to-hang-pictures) covers sofas, beds, stairs, and high ceilings.
## Picture wire
Wire is the most common hardware on store-bought frames and the easiest to get wrong, because it sits lower lying flat than it does on a nail.
**How to measure it:**
1. Lay the frame face down.
2. Hook one finger under the middle of the wire and pull it straight up toward the top of the frame, firmly, the way the nail will pull on it.
3. Measure from the top edge of the frame down to the peak of the wire.
That's the drop. On a typical frame it's somewhere between 2 and 5 inches.
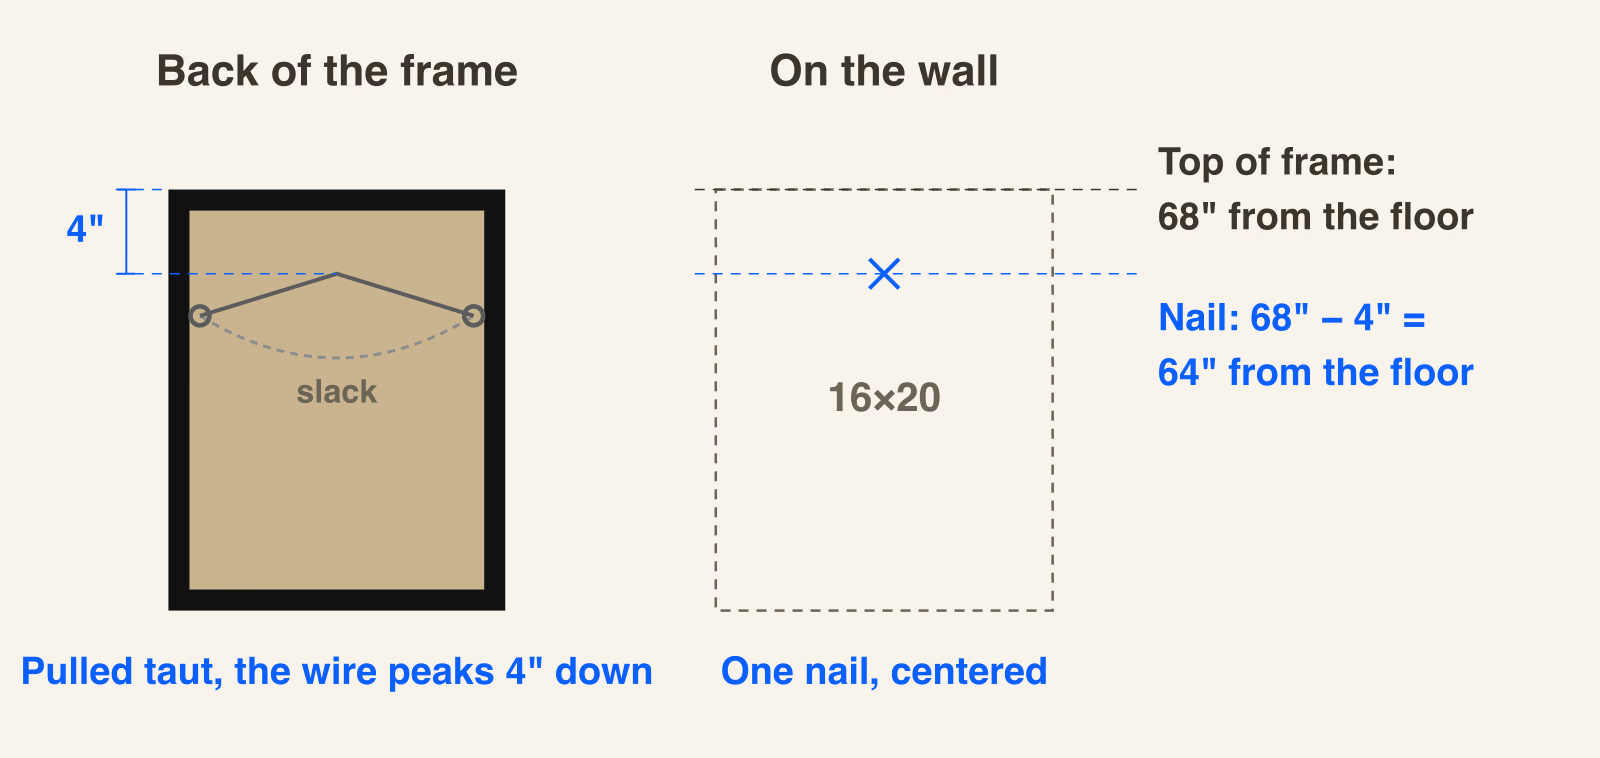
**Worked example:** A 16 x 20 frame, top of frame wanted at 68 inches. The taut wire peaks 4 inches below the top edge. Nail height = 68 − 4 = **64 inches**, at the frame's left-to-right center.
Measure the wire pulled taut, not lying slack. Top at 68″, wire peak 4″ down: the nail goes at 64″.
**When the wire reaches above the frame.** A loose wire, or wire strung through hangers mounted near the top, can peak *above* the top edge when you pull it tight. In that case the nail goes higher than the top of the frame, not lower: measure up from the top edge to the peak and add it instead of subtracting. The wire may also show above the frame once it's up. Tightening the wire so it peaks an inch or two below the top is usually the better fix.
**Two hooks on one wire.** A wide or heavy frame on wire hangs straighter on two hooks than one. Space the hooks about a third of the frame's width apart, centered. To measure the drop, pull the wire up with two fingers held that same distance apart, then measure from the top edge to the wire at your fingers. Both nails go at that height. GalleryPlanner's **Wire** setting plans one centered nail; for two hooks, choose **Two D-rings** instead and enter your measured drop and the hook spacing. That works as long as the wire stays below the top of the frame at your fingers, since only **Wire** offers **Above the frame**.
## Two D-rings
D-rings are the metal loops screwed into each side of the frame. Two of them on two nails is one of the steadiest ways to hang a frame: it stays level when it gets bumped, and it sits flatter against the wall than wire.
**How to measure:**
1. Measure from the top edge of the frame down to the **top inside edge** of one ring. That's where it rests on the nail. Not the screw, not the bottom of the ring.
2. Measure the distance between the two rings, center to center. That's your nail spacing.
3. Check that both rings sit the same distance from the top. If they don't, the frame will hang crooked on level nails. The simplest fix is moving one ring to match the other. Otherwise, measure each ring's drop and set each nail by its own: with the top at 78 inches and rings 3 and 4 inches down, the nails go at 75 and 74 inches.
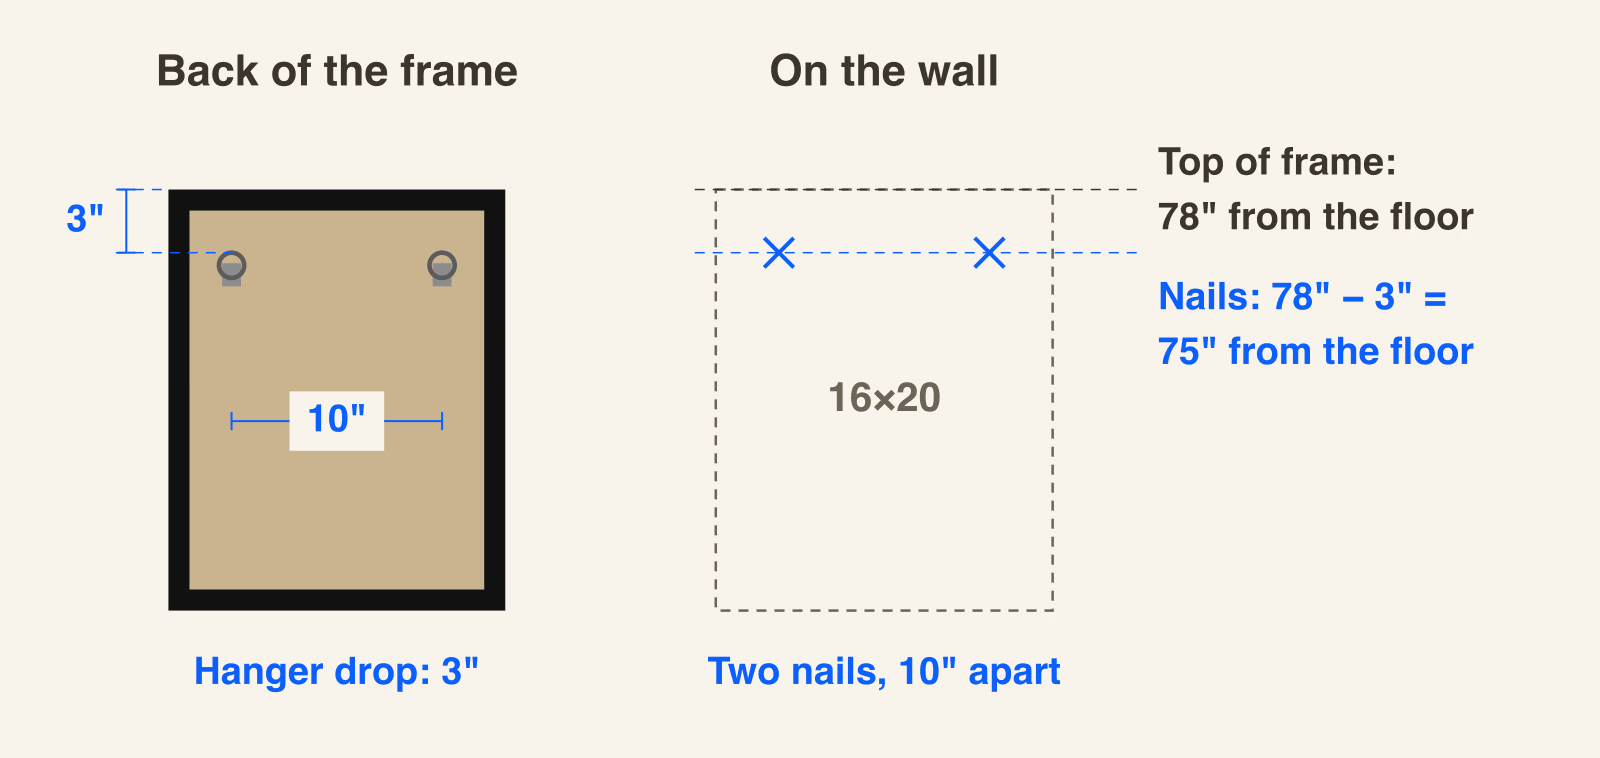
**Worked example:** A 16 x 20 frame. The rings sit 3 inches below the top and 10 inches apart. You want the top of the frame at 78 inches, centered at 40 inches from the left edge of the wall. Nail height = 78 − 3 = **75 inches**. Nails go 5 inches either side of center: at **35 and 45 inches** from the left, both at 75 inches.
Measure to the top inside edge of each ring. Top at 78″, rings 3″ down: two nails at 75″, as far apart as the rings.
Mark both nails, then hold a level across the two marks before you hammer. On two-nail hangs, that check catches nearly every problem.
## A single D-ring
Small frames sometimes have one D-ring at the top center. It works like a sawtooth: one nail at the frame's center, at top-of-frame height minus the distance from the top edge to the top inside edge of the ring. Single rings let a frame tilt, so a small dab of mounting putty on the bottom corners helps.
## Sawtooth hanger
The sawtooth is the short metal strip with teeth, usually on small and light frames.
**How to measure:** Measure from the top edge of the frame to the bottom of the middle notch. That's usually half an inch to an inch.
**Worked example:** An 8 x 10 frame, top wanted at 64 inches, sawtooth notch 3/4 inch down. Nail height = 64 − 3/4 = **63 1/4 inches**, at the frame's center.
The teeth are there for leveling. If the frame hangs a little crooked, lift it and set it one tooth over instead of moving the nail.
## Adhesive strips and hooks
No nail at all. With strips, the frame goes where you press it, so mark the corners of the frame on the wall with painter's tape instead of marking a nail spot. Check the weight limit on the package against the frame. The [renter-friendly guide](/learn/renter-friendly-galleries) covers surface prep and the brands that hold.
## If you're using a picture hook, not a bare nail
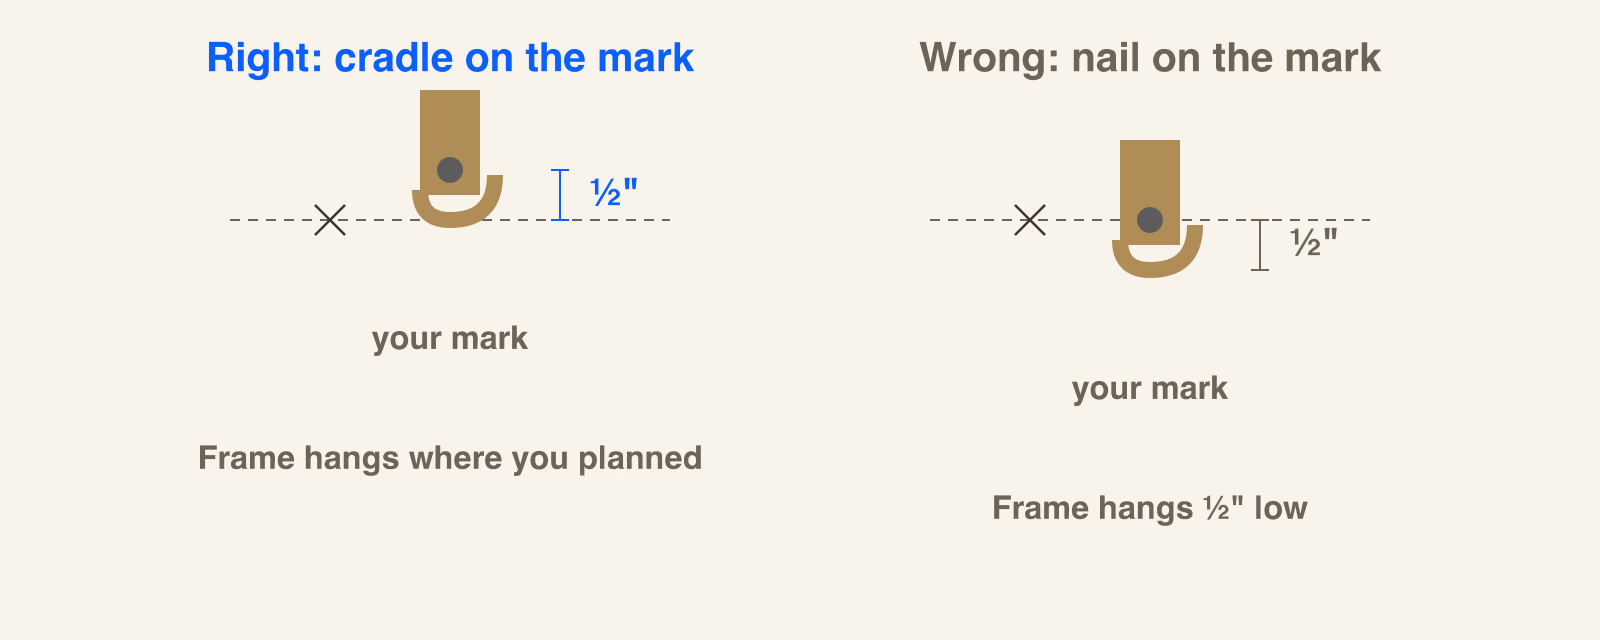
A picture hook (the small brass hanger with an angled nail) holds the wire or ring in its curved cradle, and the cradle sits below the nail hole. Your measurement marks where the cradle goes, not where the nail goes in. Hold the hook with the bottom of its cradle on your pencil mark, then drive the nail through the hook. If you put the nail on the mark instead, the frame will hang about half an inch too low.
The cradle goes on your mark. Put the nail there instead and the frame drops by the hook's height.
## Common mistakes
- **Measuring slack wire.** Lying flat, the wire sags lower than it will sit on the nail, so you subtract too much and the frame hangs lower than planned. Always pull it tight first.
- **Measuring to the frame top instead of the hardware.** Every frame then hangs high by its full hanger drop.
- **Measuring to the bottom of the D-ring.** The nail sits at the top inside edge.
- **Setting the hook's nail on the mark.** The cradle goes on the mark.
- **Guessing the D-ring spacing.** Measure center to center. Being half an inch off makes the second ring miss its nail.
## Let GalleryPlanner do the subtraction
If you're planning a whole wall, doing this math for every frame is where mistakes creep in. In GalleryPlanner, select a frame and set its **Hanging hardware**: Sawtooth, Wire, D-ring, Two D-rings, or Adhesive. Enter the **Drop** you measured (and the **Spacing** for Two D-rings). For wire that peaks above the frame, tick **Above the frame**; the field then reads **Rise**. Two D-rings uses one drop for both rings, so even them up first if they differ. Setting hardware is free.
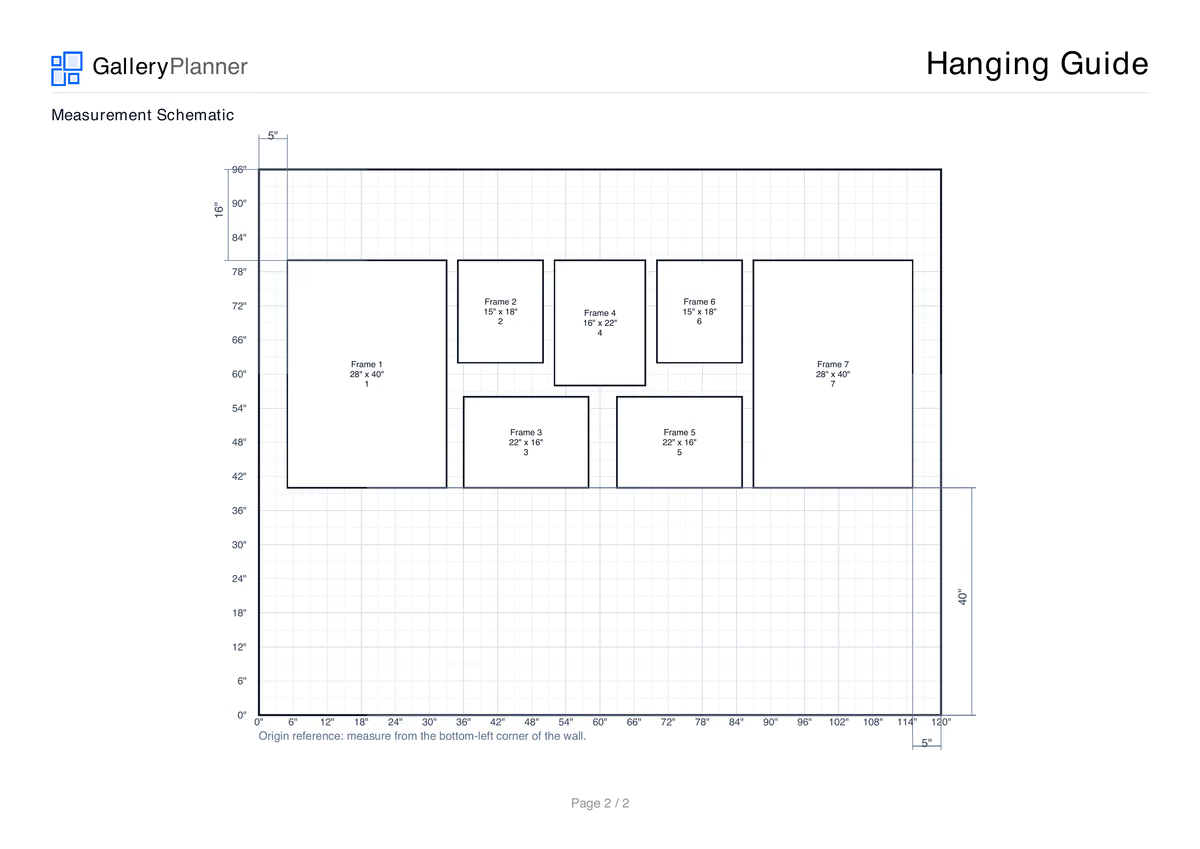
When you export the Hanging Guide (Pro), its table gets a **Nail (L · H)** column, with each nail's distance from the wall's left edge and its height from the floor (on a staircase wall, from the sloped line through the stair nosings), and every nail is marked on the Measurement Schematic. Adhesive frames get no nail. If a frame's hardware doesn't fit it, like a drop longer than the frame is tall, the guide marks it `N/A*` instead of guessing.
A real Hanging Guide export: every × is a nail, labeled with its position, and the table on the page before lists the same numbers.
See the whole thing, Nail column included, in the [sample Hanging Guide](/hanging-guide-sample).
[Plan your wall for free](/app), then set each frame's hardware before you export.
## Frequently Asked Questions
**Where do I put the nail for a picture with wire?**
Pull the wire tight toward the top of the frame and measure from the top edge down to the peak. Subtract that from the height where you want the top of the frame. The nail goes at that height, centered left to right.
**How do I hang a picture with two D-rings so it's level?**
Measure from the top of the frame to the top inside edge of a ring, and measure the ring spacing center to center. If both rings have the same drop, put two nails at the same height (top-of-frame height minus the drop), one on each side of where you want the frame's center, as far apart as the rings. Check the two marks with a level before you hammer. If the drops differ, move one ring to match, or set each nail by its own drop: rings 3 and 4 inches down, with the top at 78 inches, need nails at 75 and 74 inches.
**How far down from the top of the frame should the wire be?**
Pulled tight, about 2 to 5 inches below the top edge is typical. If the wire peaks above the frame, it's too loose: tighten it, or measure up and put the nail that far above the top of the frame.
**Is wire or D-rings better for hanging pictures?**
Two D-rings on two nails stay level and sit flatter against the wall. Wire is more forgiving if your nail is a little off, but frames on wire tend to tilt. For a gallery wall where frames need to line up, D-rings are easier.
**What height should the nail be for a picture?**
That depends on where you want the picture. A common target puts the center of the picture 57 to 60 inches from the floor. Add half the frame's height to get the top, then subtract the hanger drop to get the nail height.
**Does GalleryPlanner tell me where to put the nail?**
Yes. Set each frame's **Hanging hardware** and **Drop**, and the Pro Hanging Guide lists every nail's distance from the wall's left edge and its height, and marks each nail on the Measurement Schematic.
## Related Resources
- [How to Hang a Gallery Wall: Exact Measurements and Nail Placement](/learn/how-to-hang-a-gallery-wall) for measuring a whole wall without errors adding up
- [How High to Hang Pictures](/learn/how-high-to-hang-pictures) for choosing the height before you mark the nail
- [The Ultimate Hanging Hardware Guide](/learn/hanging-hardware-guide) for hooks and anchors by wall type and weight
- [How to Level and Adjust a Gallery Wall After Hanging](/learn/how-to-level-adjust-gallery-wall) for fixes once it's up