# Gallery Wall Spacing: How Far Apart to Hang Frames
**Quick answer:** Start with 2 to 3 inches between frames and keep that gap the same across the whole wall. Go tighter (1.5 to 2 inches) for small frames and wider (3 to 5 inches) for large pieces or big rooms. Consistency matters more than the exact number.
Perfect spacing and alignment separate amateur gallery walls from professional installations. This guide reveals the industry-standard techniques that interior designers use to create crisp, balanced layouts—and how to apply them to your own projects.
## Why Spacing and Alignment Matter
Even the most beautiful frames can look sloppy if spacing is inconsistent or alignment is off. Proper spacing and alignment:
- **Create visual rhythm** that guides the eye smoothly across your wall
- **Signal intentionality** (proving this isn't just "random frames thrown up")
- **Enhance cohesion** in eclectic layouts
- **Prevent a cluttered appearance** even with many frames
**Bottom line:** Spacing and alignment are the invisible glue that hold your gallery wall together.
---
## The Golden Spacing Rules
Here's a quick reference before diving into the details:
| Rule | Measurement | Notes |
|------|-------------|-------|
| Frame-to-frame spacing | 2-3 inches | Consistent throughout the layout |
| Above furniture | 6-10 inches | From furniture top to frame bottom |
| Eye-level center | 57-60 inches | Center of entire layout from floor |
| Wall coverage | 50-70% | Leave breathing room |
### Rule 1: The 2-3 Inch Standard
**The rule:** Maintain **2-3 inches** between all frames, consistently.
| Spacing | Best For | Feel |
|---------|----------|------|
| 2 inches | Grid layouts, uniform frames | Tight, modern, cohesive |
| 3 inches | Mixed sizes, salon walls | Balanced, breathable |
| < 2 inches | — | Too cramped |
| > 4 inches | — | Feels disconnected |
**Why these numbers?**
- **2 inches:** Tight, modern, cohesive—best for uniform frames (e.g., grid layouts)
- **3 inches:** Slightly more breathing room—best for mixed sizes and salon walls
- **Anything less than 2":** Frames feel cramped and crowded
- **Anything more than 4":** The layout starts to feel disconnected
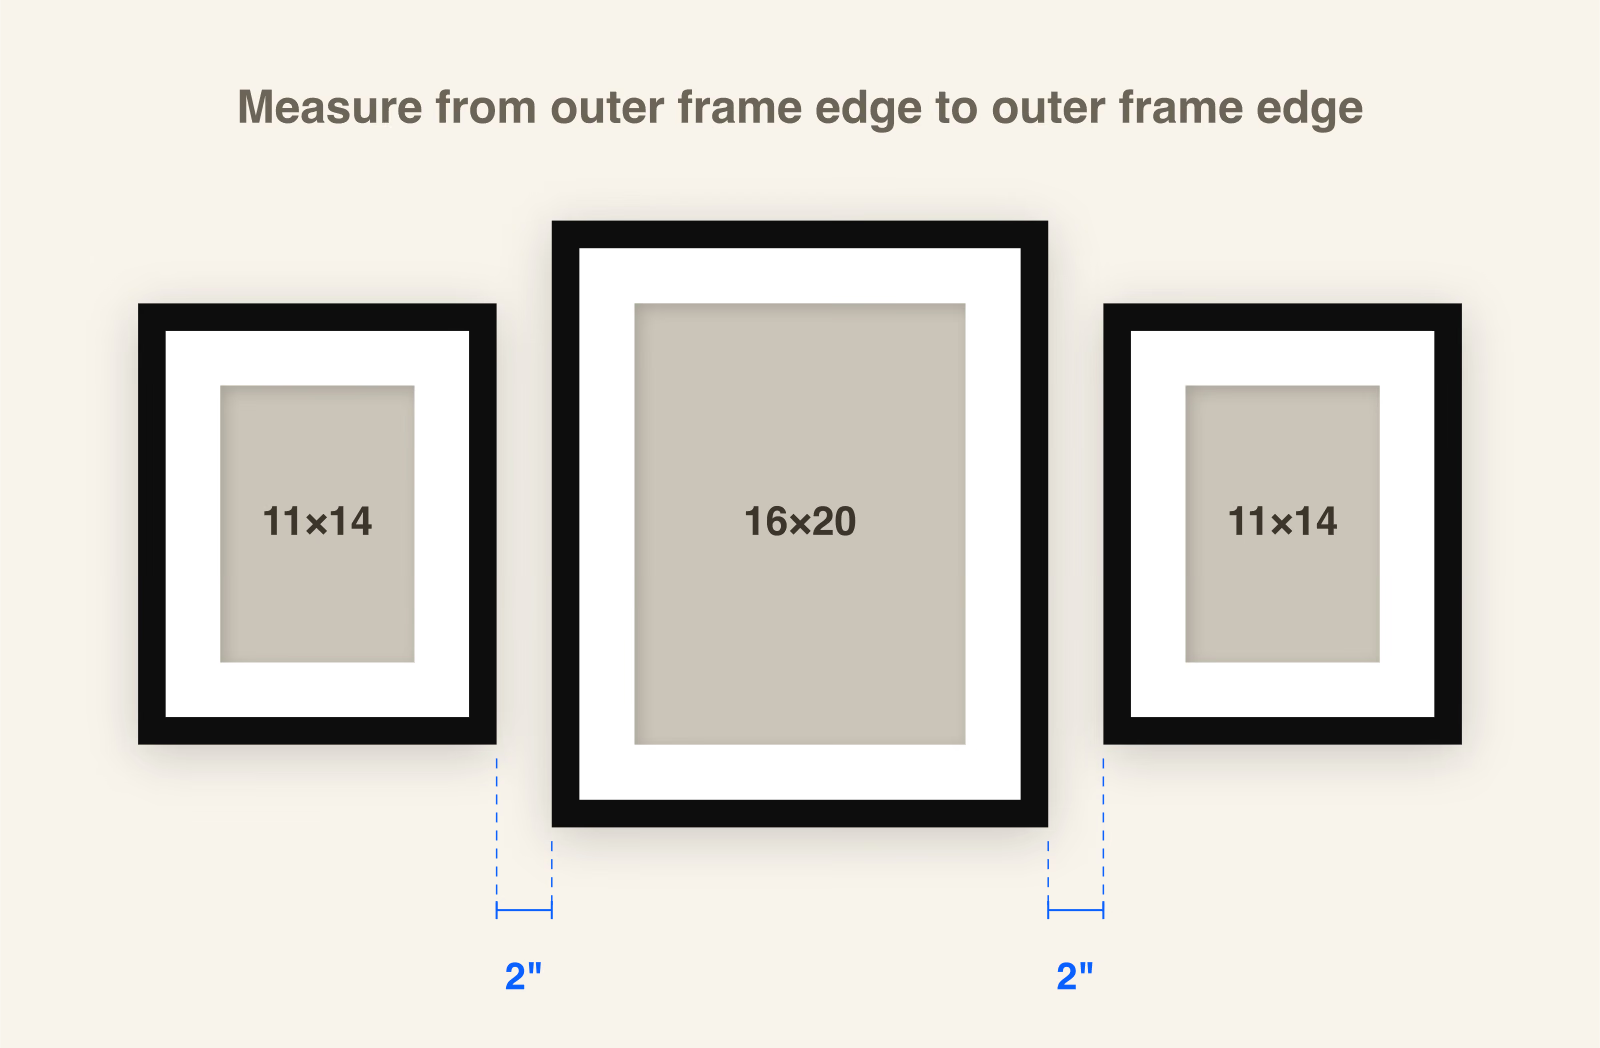
**How to measure:** Measure from frame edge to frame edge, **not** mat to mat or photo to photo. The outer frame is what matters.
The gap runs from the outside of one frame to the outside of the next, not from mat to mat.
**Consistency is key:** Pick 2" OR 3" and stick to it everywhere. Don't use 2" in some spots and 4" in others (unless you're doing an advanced asymmetrical layout).
---
### Rule 2: Equal Edge Margins
**The rule:** Leave equal space from the edges of your layout to the wall boundaries.
**Why it works:** Centering your layout creates balance and prevents the "floating frames randomly on a wall" look.
**How to calculate:**
1. Measure your wall width (e.g., 96 inches)
2. Measure your total layout width (e.g., 70 inches)
3. Subtract: 96 - 70 = 26 inches remaining
4. Divide by 2: 26 ÷ 2 = 13 inches margin on each side
**Same applies vertically** for top and bottom margins.
**Pro tip:** Use [GalleryPlanner](/app) to auto-calculate perfect margins. It centers your layout automatically.
---
### Rule 3: Negative Space is Your Friend
**The rule:** Don't fill more than **60-70%** of your wall with frames.
**Why it works:** Negative space (empty wall) gives your eye a place to rest and prevents visual overwhelm.
**How to check:**
- Estimate your wall area (width × height)
- Estimate your total frame area (sum of all frame areas)
- If frames cover more than 70%, remove a few or increase wall size
**Example:**
- Wall: 96" × 72" = 6,912 sq in
- Frames: 10 frames averaging 100 sq in each = 1,000 sq in
- Coverage: 1,000 ÷ 6,912 = ~14% (too sparse!)
- **Action:** Add more frames OR reduce wall area
**Sweet spot:** 50-70% coverage depending on style (grids tend toward 50%, salon walls toward 70%).
---
### Pro Shortcut: Center at Eye Level
GalleryPlanner Pro includes a one-click **Eye Level** action, in the selection toolbar's align menu, that centers the selected layout on your eye-level line.
- **Centers the composition around 60 inches** from the floor by default
- **Adjustable in Settings → Canvas → Eye level** if your preferred target is different
- **Works well when you want a repeatable starting point** for a new wall or a variation of an existing one
Turn on the **Eye-level Guide** when you want a visible baseline, then adjust the edges afterward.
## Alignment Techniques: Creating Visual Order
Alignment is what makes asymmetrical or eclectic layouts feel cohesive instead of chaotic.
### Technique 1: Horizontal Alignment
**What it is:** Aligning frames along a horizontal line (top edge, bottom edge, or centerline).
**When to use:**
- Linear layouts (single row of frames)
- Skyline-style walls
- Above furniture (sofa, console table, bed)
**How to execute:**
1. Decide on your alignment line (e.g., "top edges at 60 inches from floor")
2. Mark a light pencil line on your wall
3. Hang all frames so their top edges align to this line
**Variations:**
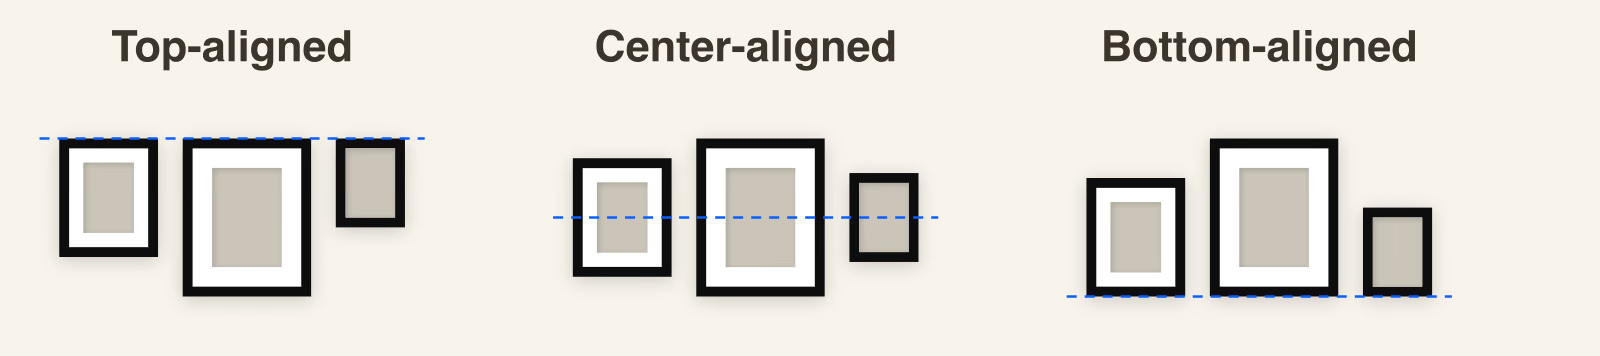
- **Top-align:** All frames have the same top edge (creates a clean horizontal line)
- **Bottom-align:** All frames have the same bottom edge (common above furniture)
- **Center-align:** All frames centered on the same horizontal line (works with varying heights)
The same three frames, top-aligned, center-aligned, and bottom-aligned.
**Pro tip:** Use a laser level or painter's tape to mark your alignment line before hanging.
---
### Technique 2: Vertical Alignment
**What it is:** Aligning frames along a vertical line (left edge, right edge, or centerline).
**When to use:**
- Column layouts (stacked frames)
- Asymmetrical layouts that need structure
- Staircase walls
**How to execute:**
1. Establish a vertical centerline or edge line
2. Align frames so their edges or centers match this line
**Example:** A vertical column of 3 frames, all centered on the same vertical line, with 3 inches between each frame.
---
### Technique 3: Grid Alignment
**What it is:** Frames aligned both horizontally AND vertically in a perfect grid.
**When to use:**
- Uniform frame sizes
- Modern, minimalist aesthetics
- Photo series or collections
**How to execute:**
1. Use GalleryPlanner's Grid algorithm to calculate exact positions
2. Mark all positions on your wall with a pencil
3. Hang frames according to marks
**Key measurements:**
- Consistent horizontal spacing (e.g., 2" between all frames left-to-right)
- Consistent vertical spacing (e.g., 2" between all frames top-to-bottom)
- Entire grid centered on the wall
**Pro tip:** Grid alignment is the *easiest* to get right because it's formulaic. It's also the least forgiving—even a 1/4" error is noticeable.
---
### Technique 4: Invisible Shapes (Advanced)
**What it is:** Arranging frames to loosely fill an invisible geometric shape (circle, triangle, rectangle, diamond).
**When to use:**
- Asymmetrical layouts
- Salon walls
- Creative, artistic compositions
**How to execute:**
1. Imagine (or lightly sketch) a shape on your wall (e.g., a large circle)
2. Arrange frames to loosely stay within that shape's boundaries
3. Allow some frames to break the boundary slightly for organic feel
**Common shapes:**
- **Circle:** Frames radiate outward from a central point, staying within a circular boundary
- **Triangle:** Pyramid shape with largest frame at bottom center
- **Rectangle:** Frames fill a rectangular area without perfectly aligning
**Pro tip:** This technique creates cohesion in otherwise chaotic layouts. The eye sees the overall shape even if individual frames vary wildly.
---
## The Eye-Level Rule
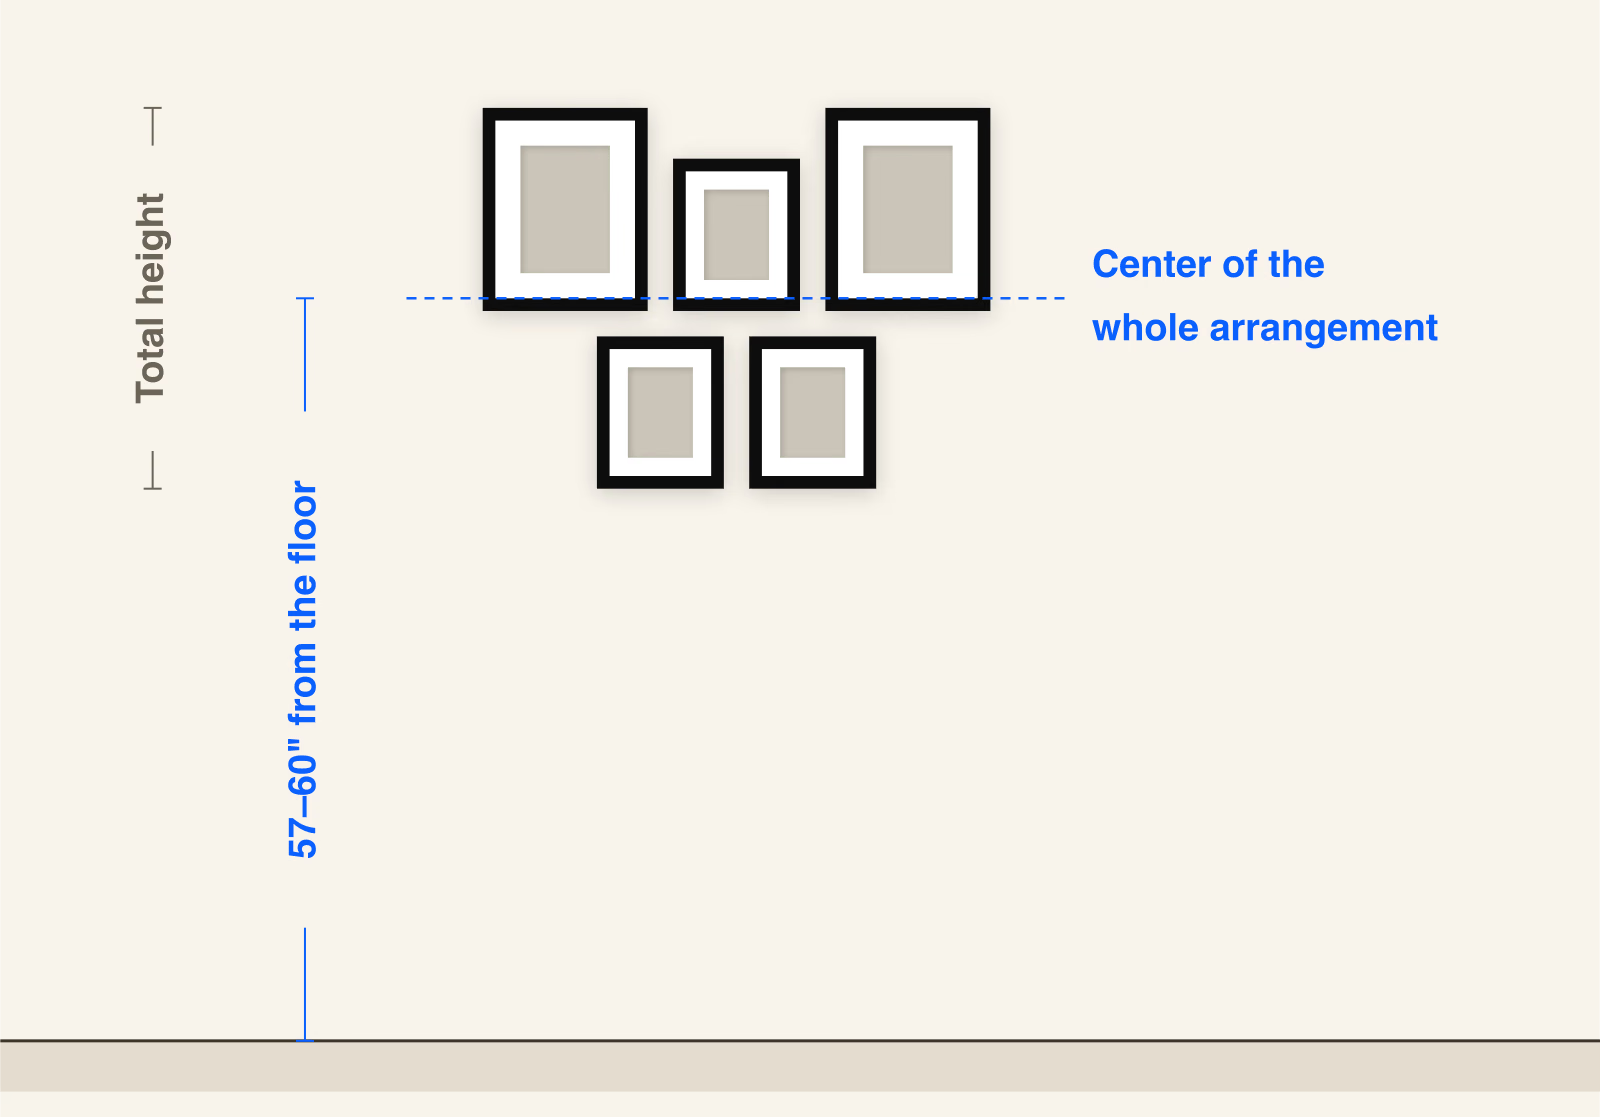
**The rule:** The center of your gallery wall should be at **57-60 inches** from the floor.
**Why this height?**
- 57-60" is average eye level for most adults
- Museums and galleries use this standard
- It feels natural and accessible
**How to calculate the center:**
1. Measure the total height of your layout (e.g., 48 inches tall)
2. Divide by 2 to find the midpoint (48 ÷ 2 = 24 inches)
3. Add 57 inches (or your preferred eye level): 57 + 24 = **81 inches from floor to top of layout**
4. Mark this point on your wall, then measure down 24 inches to find your center mark
The 57–60" mark is for the middle of the whole group, not each frame.
**Exceptions:**
- **Staircase walls:** Eye level changes as you climb—use a sliding scale. GalleryPlanner's **Eye-level Guide** does this for you on a staircase wall, running parallel to the stairs at your Eye level above them
- **Above furniture:** Bottom of frames should be 6-10 inches above furniture top (this may adjust overall eye-level positioning)
- **Children's spaces:** Lower the center to child eye level (around 48")
For sofas, beds, mantels, stairs, high ceilings, and dining rooms, see [How High to Hang Pictures](/learn/how-high-to-hang-pictures).
---
## Spacing Scenarios: Solving Common Challenges
### Scenario 1: One Large + Several Small Frames
**The challenge:** Small frames look lost next to the large focal point.
**The solution:**
1. Group small frames into a cluster (2-3 frames close together)
2. Treat the cluster as a single visual unit
3. Maintain standard 2-3" spacing between the cluster and the large frame
**Example:** One 16×20 on the left, a cluster of three 5×7 frames on the right (with only 1" spacing within the cluster, but 3" from the cluster to the 16×20).
---
### Scenario 2: Frames Above Furniture
**The challenge:** Determining the right spacing between furniture and frames.
**The solution:**
- **Minimum:** 6 inches above furniture
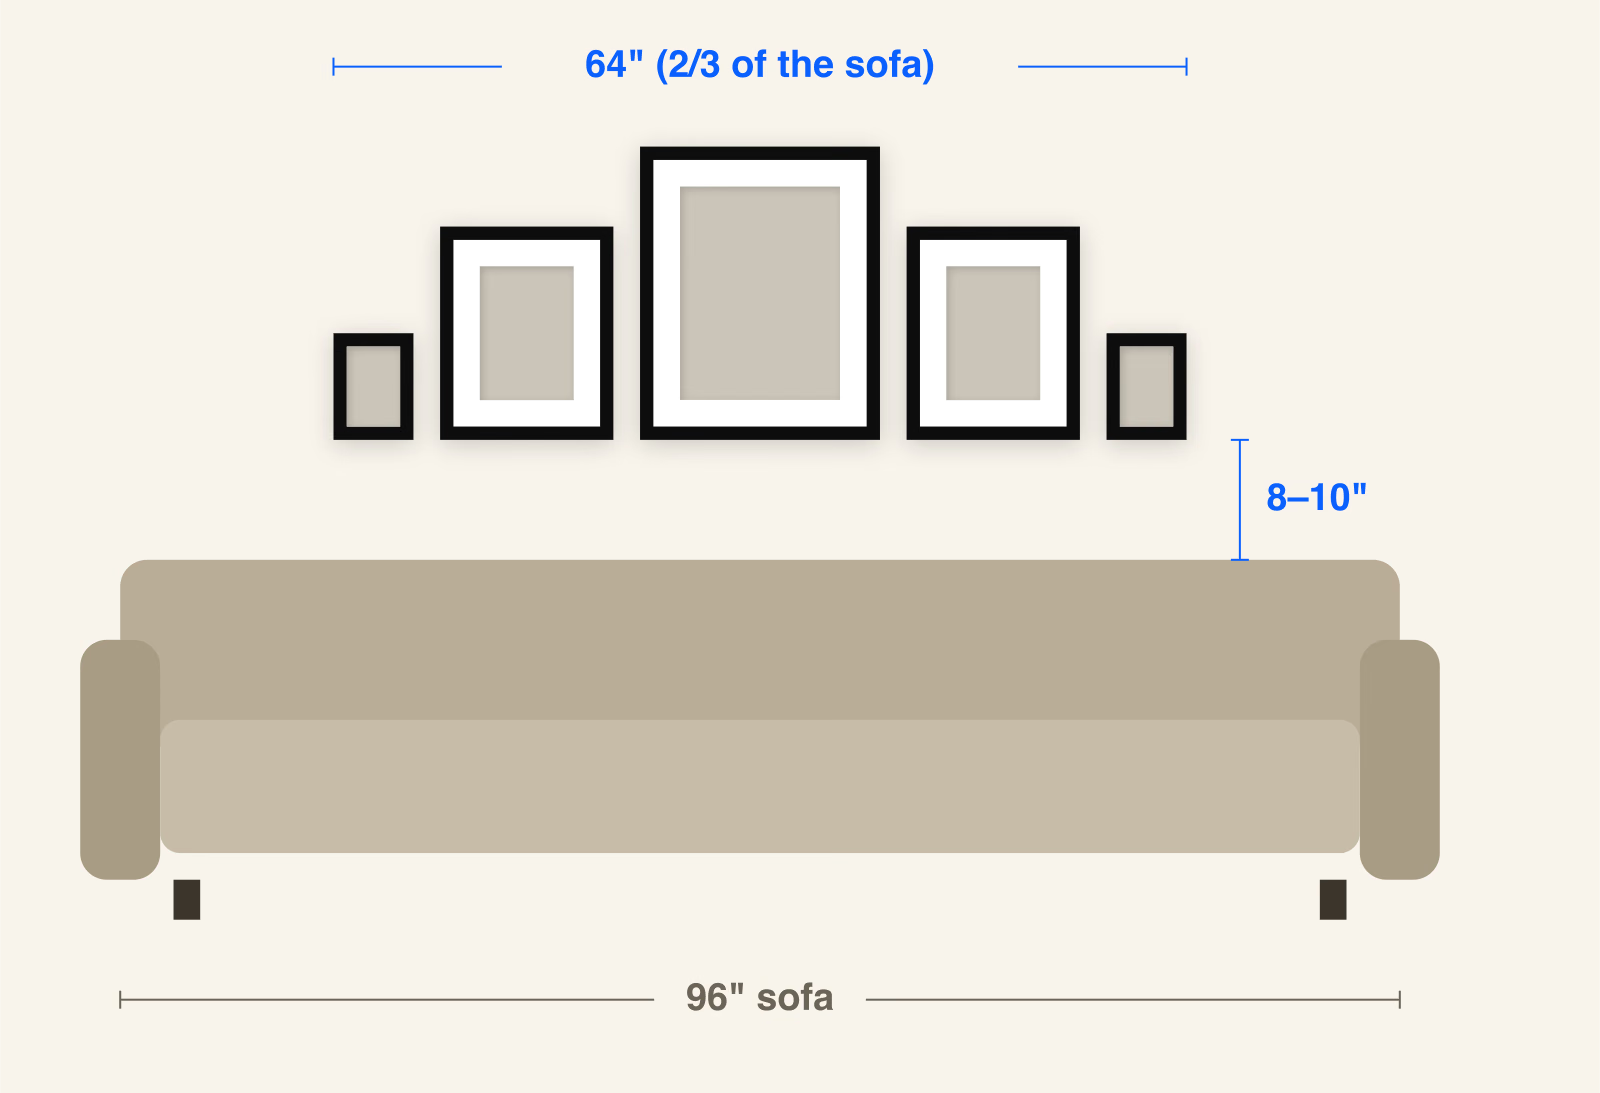
- **Optimal:** 8-10 inches
- **Maximum:** 12 inches (beyond this, frames feel disconnected from the furniture)
**Why:** This spacing visually "anchors" the gallery wall to the furniture below, creating a cohesive unit.
**Pro tip:** For sofas specifically, aim for your gallery wall to be 2/3 to 3/4 the width of the sofa for proportional balance.
A 64" arrangement over a 96" sofa, with 8–10" between the sofa back and the lowest frame.
---
### Scenario 3: Filling Awkward Gaps
**The challenge:** You've spaced most frames at 2", but now you have a weird 6" gap that feels too large.
**The solution:**
1. **Option A:** Add a small frame to fill the gap (5×7 or smaller)
2. **Option B:** Redistribute spacing—slightly increase all gaps to make the 6" gap feel intentional
3. **Option C:** Embrace the negative space as an intentional design element (works in minimalist layouts)
**What not to do:** Leave the 6" gap while all others are 2"—it will look like a mistake.
---
## Tools for Perfect Spacing and Alignment
### Tool 1: GalleryPlanner (Digital)
**What it does:** Calculates exact spacing and alignment automatically. Exports a PDF with precise measurements (**Pro Only**).
**When to use:** **Always.** Planning digitally prevents costly mistakes.
**Doing it in the app:** Select two or more frames on the canvas and the **floating toolbar** appears above them. From there:
- **Align** — snap selected frames left, center, right, top, middle, or bottom relative to each other (or relative to the wall when a single frame is selected).
- **Distribute** — select **3 or more** frames and tap **Distribute Horizontally** or **Distribute Vertically** to equalize the gaps between them in one click. This is the fastest way to fix uneven 2", 2.5", 2.25" gap drift across a row.
- **Spacing guides** — as you drag, labels show the gap to the nearest frame on each side and to the wall's edge. When a gap matches another gap on the wall it turns blue, and the frame snaps into equal spacing or into line with a neighbor's edge or center. Turn **Spacing Guides** or **Snap to Guides** off in Settings, or hold `Shift` while dragging with a mouse to switch snapping for that drag.
- **Snap-to-grid** — toggle with `S` on desktop, or from the canvas control bar.
- **Eye Level (Pro)** — in the align menu, drops your selection onto your Eye level line (60" / 150 cm unless you change it in Settings → Canvas) so your wall's vertical anchor is consistent.
[Try GalleryPlanner →](/)
---
### Tool 2: Paper Templates
**What it does:** Full-size paper cutouts of your frames that you tape to the wall to preview placement.
**How to use:**
1. Cut paper (newspaper, craft paper, or packing paper) to match frame sizes
2. Tape paper templates to the wall in your desired arrangement
3. Adjust until spacing looks perfect
4. Mark nail positions through the paper
5. Remove paper and hang real frames
**When to use:** When you want to see the layout in situ before making holes.
---
### Tool 3: Laser Level
**What it does:** Projects a perfectly straight horizontal or vertical line on your wall.
**When to use:** Grid layouts, linear arrangements, any time you need precise alignment.
**Cost:** $20-50 for a basic model. Worth the investment if you're doing multiple gallery walls.
---
### Tool 4: Painter's Tape
**What it does:** Marks alignment lines that are easy to remove.
**How to use:**
1. Use a level to place tape in a perfectly horizontal line at your desired height
2. Align frame tops or bottoms to the tape
3. Remove tape when done
**When to use:** Horizontal alignment, edge boundaries.
---
## Advanced Spacing Tricks
### Trick 1: Variable Spacing (Intentional)
**The concept:** Not all gaps are 2-3"—some are larger *on purpose*.
**When it works:**
- Separating distinct "zones" in a large salon wall
- Creating visual breathing room around the focal point
- Emphasizing negative space in minimalist layouts
**How to execute:**
- Most gaps: 2"
- Strategic gaps: 5-6" (used sparingly to create separation)
- Key: The large gaps must feel intentional and symmetrical
**Example:** Three clusters of frames, each cluster has 2" internal spacing, but 6" between clusters.
---
### Trick 2: Breaking the Rules (Carefully)
**When it's okay to deviate:**
- Architectural constraints (windows, outlets, switches) force adjustments
- Artistic vision requires asymmetry or unexpected gaps
- You're experienced enough to know when breaking rules enhances the design
**Golden rule of breaking rules:** If you're going to deviate from standard spacing, **commit to it**. A half-broken rule looks like a mistake; a fully broken rule looks intentional.
---
## Common Spacing and Alignment Mistakes
### ❌ Mistake 1: Eyeballing It
**The problem:** "Looks about right" leads to uneven spacing and crooked frames.
**The fix:** Measure everything. Use a tape measure, level, and ruler. Trust the numbers, not your eye.
---
### ❌ Mistake 2: Hanging Too High
**The problem:** Treating each frame like a standalone piece and hanging at '57" center' individually results in the overall gallery wall being too high.
**The fix:** The **center of the entire layout** should be at 57", not each individual frame.
---
### ❌ Mistake 3: Inconsistent Spacing
**The problem:** Some frames are 2" apart, some are 5" apart, with no clear pattern.
**The fix:** Pick one spacing measurement and stick to it (with rare, intentional exceptions).
---
### ❌ Mistake 4: Ignoring Furniture Proximity
**The problem:** Frames floating too far above furniture or crammed too close.
**The fix:** 6-10 inches between furniture top and frame bottoms, with 8-10 inches as the sweet spot.
---
## Step-by-Step: Measuring and Marking for Perfect Installation
Ready to hang your gallery wall with professional precision? Follow these steps:
### Step 1: Plan in GalleryPlanner
1. Create your layout digitally
2. Export the PDF hanging guide (**Pro Only**)
3. Print it for reference
---
### Step 2: Find Your Center Point
1. Measure your wall width and height
2. Mark the wall's center point lightly with a pencil
3. Use the measurements from your PDF to mark where your layout's center should be
---
### Step 3: Mark Frame Positions
Using your PDF as a guide:
1. Mark the top-left corner of your first frame
2. Measure and mark the spacing to the next frame (2-3")
3. Continue marking all frame positions
4. Double-check alignment with a level
---
### Step 4: Mark Nail Positions
For each frame:
1. Measure from the top of the frame to the hanging hardware (this varies per frame)
2. Subtract this measurement from your frame-top mark to find the nail position
3. Mark the nail spot with a small "X"
If you set each frame's **Hanging hardware** in GalleryPlanner, the Hanging Guide (**Pro Only**) does this subtraction for you and lists every nail position. [Where to put the nail](/learn/where-to-put-nail-hanging-picture) covers measuring wire, D-rings, and sawtooth hangers.
For a full walkthrough of hanger drop, D-ring spacing, and why you should measure every mark from the floor instead of the last frame, see [How to Hang a Gallery Wall](/learn/how-to-hang-a-gallery-wall).
---
### Step 5: Hang and Adjust
1. Hammer nails at marked positions
2. Hang frames
3. Use a level to ensure they're straight
4. Make minor adjustments as needed
**Pro tip:** Start with the largest/central frame first, then build outward. This lets you make small adjustments to surrounding frames without redoing everything.
---
## Conclusion: Precision Pays Off
Perfect spacing and alignment transform a collection of frames into a cohesive work of art. While it takes extra time to measure and plan, the result is a gallery wall that looks professionally installed.
**Key takeaways:**
- **2-3 inches** between all frames
- **57-60 inches** for center of layout
- Use **alignment techniques** (horizontal, vertical, grid, invisible shapes)
- **Plan first** using GalleryPlanner to avoid mistakes
---
## Frequently Asked Questions
**How far apart should frames be in a gallery wall?**
Two to three inches is the standard starting point. Small frames can sit 1.5 to 2 inches apart. Large pieces and high-ceiling rooms usually look better with 3 to 5 inches.
**Should every frame have the same gap?**
Yes, for grid and most mixed-size layouts. The same gap everywhere is what makes an arrangement read as planned. Salon-style walls can vary the gaps a little, but keep them within about an inch of each other.
**Should I measure the artwork or the outer frame?**
The outer frame. Mats and molding add inches you have to account for, and the outer edge is what your eye lines up on the wall.
**How wide should a gallery wall be above a sofa?**
About two thirds of the sofa's width. A 90-inch sofa wants an arrangement roughly 60 inches wide. Center it on the sofa, not on the wall.
**How do I keep spacing even when hanging?**
Mark every frame position from the floor and one wall edge, not from the frame next to it. Small errors stop adding up across the row.
**Can GalleryPlanner set the spacing for me?**
Yes. Drag a frame and the spacing guides show the gap to its neighbors, turn blue when gaps match, and snap it into equal spacing. To even out a whole row, select the frames and use **Distribute Horizontally** or **Distribute Vertically** in the floating toolbar, or let Auto-Layout place everything with an even gap you can adjust.
## Related Resources
- **[Getting Started with GalleryPlanner](/learn/getting-started-with-galleryplanner):** Create your first layout with precise spacing
- **[Complete Guide to Gallery Walls](/learn/complete-guide-to-gallery-walls):** Overall design principles and installation tips
- **[Choosing Frame Sizes](/learn/choosing-frame-sizes):** Get proportion and scale right before worrying about spacing
- **[Gallery Wall Styles](/learn/gallery-wall-styles-explained):** Different styles use different alignment approaches
**Ready to design a perfectly spaced gallery wall?** [Launch GalleryPlanner →](/)